The DIY thread - DIYourself

thanks guys. this does control the pool pump outside which is a twist lock 120v outdoor outlet out by the pool. the old timer has been this way since we moved here since 2003.

I 100% appreciate the feedback. We checked and double checked the manufacturer video (which is private and requires a login for some reason) but also referenced this one first. plus my son found a graphic which shows 240v option that we did not follow obviously.
1686571867140.png


The only difference between this video and the way we wired it is that instead of using wire nuts and jumpers to connect everything, we took advantage of the option that the ports for each allow up to 3 wires. Thats why you see L1 with 2 wires (hot and Jumper) and L2 with 2 wires (direct from the supply and load wires). Maybe thats what was concerning on how we did it but the way the wires were feeding into the wire nuts didnt feel secure enough to me.

I would never have tried this or attempted any of it if i wasnt 100% sure I was not creating a risk. if you think different after seeing above let me know.

edit* p.s. timer shut off last night at the programmed time.
 
thanks guys. this does control the pool pump outside which is a twist lock 120v outdoor outlet out by the pool. the old timer has been this way since we moved here since 2003.

I 100% appreciate the feedback. We checked and double checked the manufacturer video (which is private and requires a login for some reason) but also referenced this one first. plus my son found a graphic which shows 240v option that we did not follow obviously.
View attachment 215604


The only difference between this video and the way we wired it is that instead of using wire nuts and jumpers to connect everything, we took advantage of the option that the ports for each allow up to 3 wires. Thats why you see L1 with 2 wires (hot and Jumper) and L2 with 2 wires (direct from the supply and load wires). Maybe thats what was concerning on how we did it but the way the wires were feeding into the wire nuts didnt feel secure enough to me.

I would never have tried this or attempted any of it if i wasnt 100% sure I was not creating a risk. if you think different after seeing above let me know.

Looks good to me.

I wouldn't do 3 wires in those terminals. Two of the same size, sure.

Pretty sure taping a neutral black is against code now.
 
Looks good to me.

I wouldn't do 3 wires in those terminals. Two of the same size, sure.

Pretty sure taping a neutral black is against code now.
yeah we said the same thing - two wires side by side fit fine and we made sure they weren't crossed at the port so we could easily see which wire goes to which feed (Left side/Right side) if that makes sense. and also agree we didnt think we should be using any electrical tape inside the box since there wasnt any previously.
 
I would never have tried this or attempted any of it if i wasnt 100% sure I was not creating a risk. if you think different after seeing above let me know.

I wish I could have taken a basic electrical wiring course in high school instead of that fourth year of Latin. (It was not quite dead yet when I was in HS.) My father was an electrician, so I saw how things "worked." Then again, when we sold their house the inspector noted multiple examples of "unprofessional wiring" as he had a lot of temporary setups that were "good enough." He was actually much better with plumbing, as he didn't know enough to get away with shortcuts. Two summers of being an apprentice electrician only taught me how to get coffee and THE&C sandwiches for large construction crews. Not only are those buildings all still standing, but so is my house


...so far
 
I think all of the visible conductor needs to be taped, not just a single wrap.

Can't use it in a raceway noted after quick lookup
Taping for identification. Putting white tape on a black wire was an easy way to re-designate a wire. Or white tape on a black wire.
The problem is tape comes off, etc.

I'm not 100% sure on it but I know the code is now not putting green tape on other colored colors do designate a ground wire unless it's larger than 6AWG. So I was assuming this was also the case with Hots and Neutrals but could be wrong. But it's not the best practice anyway, use the right colored wires and there's no confusion.

yeah we said the same thing - two wires side by side fit fine and we made sure they weren't crossed at the port so we could easily see which wire goes to which feed (Left side/Right side) if that makes sense. and also agree we didnt think we should be using any electrical tape inside the box since there wasnt any previously.

No need for tape, you did it the cleanest/best way. Using wire nuts would have just added another layer of complexity.

More importantly, DOES IT WORK?
 
Taping for identification
ahhh got it - we never even had a thought to do that. in fact we had a leftover white jumper wire but we didnt use it so we didnt mix the colors. the only thing I really needed from the store was 6" of black 14G wire for the jumper.

No need for tape, you did it the cleanest/best way. Using wire nuts would have just added another layer of complexity.

More importantly, DOES IT WORK?
thanks and YES working as expected so we declared success.


images
 
Any recommendations for support brackets? @KenS ?
There are lots of single and double armed universal ones to choose from. Are they any good? I'd be inclined to go for the double.
Something like this: Amazon product ASIN B08XGRW5W5
I'm a fan of anything that bolts into the bottom rail of the housing. Those look great for your project. Happy to see that you got it out too! Bracing it with wood was a good call.
 
I'm a fan of anything that bolts into the bottom rail of the housing. Those look great for your project. Happy to see that you got it out too! Bracing it with wood was a good call.
Thanks. This unit is designed for both window and through the wall installation. The brackets I got are for window units but pretty sure I can make 'em work. Whoever installed it did not secure the metal box to the framing in any way. the 2x4 "brackets" they used were fastened to the metal box with a self tapping screw and to the house with nails toenailed into the siding and sheathing (not any studs).
 
I just replaced my sisters pool timer with the same one. The wiring isn't as intuitive as you would think it would be.

It was all mounted to a post (which I also replaced) with a switch as the disconnect and and non working GFI outlet I needed to fix.

Didnt take any pics that day as I just wanted to get done and gone.
glad it wasnt just me - my son understands now why i replaced the mechanical one with the same one that broke last time - no wiring changes needed and i didnt even have to take the box off the wall. I just bought the module.

hoping this new one outlasts me and I dont have to change it again,
 
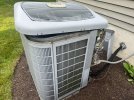
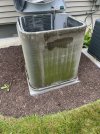
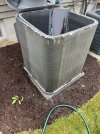
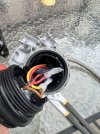
AC Condenser service. Wasn't as bad as I thought it could have been. More stuff in the bottom of the big unit. Got all the drains flushed and the coils cleaned. All the screws went back. No leftovers!


View attachment 215632

View attachment 215631


View attachment 215630

View attachment 215633
lesson i learned 2 summer ago was to do this every season.

i did this for the first time in years and it made a HUGE difference in the cooling of the house. my old one was caked with so much grass and dead vegetation i think i have it posted somewhere here, because thats when I changed the capacitor for the first time ever myself and it got me back up and running.

then of course that winter my furnace shit the bed so ended up replacing everything (central ac and furnace combo).
 
glad it wasnt just me - my son understands now why i replaced the mechanical one with the same one that broke last time - no wiring changes needed and i didnt even have to take the box off the wall. I just bought the module.

hoping this new one outlasts me and I dont have to change it again,

My mechanical one may be 25 years old! but it is

 
This is probably one for @Santapez -

grabbed a used cable for the pool robot - it has a swivel on it, which keeps the cord from coiling.
it is in the water for 5 minutes and throws a cable error. Great. The end connections have a little corrosion,
so i clean them up, add some dielectric grease, and reassemble. No good.
Pull the cable off, do a continuity test, seems ok. pins match the old cable.
Hook it back up, put it in the water, works for 3 minutes.
It has to be the swivel.

Pull it apart, and out comes the water. Salt water pool, so yeah.

IMG_4674.JPG

Repaired a corroded wire splice (i soldered two which were crimped) - cleaned it up, tightened up a couple of the cord seals,
and off it goes, happy as can be.

I added some lube to the o-ring, hoping that was enough to seal it up.
the other end held water when i filled it.

Now i'm looking everywhere, in case this repair fails - where can i find a generic submersible slip ring - 3 wires ??
Also, i could add one to my old cable, and have a back-up.

Before pic

IMG_4675.JPG
 
Last edited:
This is probably one for @Santapez -

grabbed a used cable for the pool robot - it has a swivel on it, which keeps the cord from coiling.
it is in the water for 5 minutes and throws a cable error. Great. The end connections have a little corrosion,
so i clean them up, add some dielectric grease, and reassemble. No good.
Pull the cable off, do a continuity test, seems ok. pins match the old cable.
Hook it back up, put it in the water, works for 3 minutes.
It has to be the swivel.

Pull it apart, and out comes the water. Salt water pool, so yeah.

View attachment 216130

Repaired a corroded wire splice (i soldered two which were crimped) - cleaned it up, tightened up a couple of the cord seals,
and off it goes, happy as can be.

I added some lube to the o-ring, hoping that was enough to seal it up.
the other end held water when i filled it.

Now i'm looking everywhere, in case this repair fails - where can i find a generic submersible slip ring - 3 wires ??
Also, i could add one to my old cable, and have a back-up.

Before pic

View attachment 216131

Pool robots are still a thing? Do they really do anything?
 
Pool robots are still a thing? Do they really do anything?

will drown ya if you aren't nice to them.

yes - they've come a long way since the old pressure driven ones that needed their own 10 amp pump.
I don't have one, but there is one with an app so you can drive it around the pool bottom to hit specific spots.
 
This is probably one for @Santapez -

grabbed a used cable for the pool robot - it has a swivel on it, which keeps the cord from coiling.
it is in the water for 5 minutes and throws a cable error. Great. The end connections have a little corrosion,
so i clean them up, add some dielectric grease, and reassemble. No good.
Pull the cable off, do a continuity test, seems ok. pins match the old cable.
Hook it back up, put it in the water, works for 3 minutes.
It has to be the swivel.

Pull it apart, and out comes the water. Salt water pool, so yeah.

View attachment 216130

Repaired a corroded wire splice (i soldered two which were crimped) - cleaned it up, tightened up a couple of the cord seals,
and off it goes, happy as can be.

I added some lube to the o-ring, hoping that was enough to seal it up.
the other end held water when i filled it.

Now i'm looking everywhere, in case this repair fails - where can i find a generic submersible slip ring - 3 wires ??
Also, i could add one to my old cable, and have a back-up.

Before pic

View attachment 216131
No idea where you can get a swivel thing like that, never seen it.

I will say that submersible things in my industry are always silicone potted, we have a lot of submersible connections. Basically the whole inside filled with something like this:
Amazon product ASIN B0063U2RT8
 
will drown ya if you aren't nice to them.

yes - they've come a long way since the old pressure driven ones that needed their own 10 amp pump.
I don't have one, but there is one with an app so you can drive it around the pool bottom to hit specific spots.

We just use the old-fashioned weekly pool service. Takes care of everything.
 
Back
Top Bottom