All the ones I see online look to come off with a regular socket wrench. On this one it looks like I’d need a cone wrench to remove it. The threads for the trim piece is wider than the nut below. Does that seem right?Need a new cartridge as the o-ring is prob shot. The top half should spin out, possibly reverse thread, take to home depot and match up. But shut the water off first from the angle stop below the sink.
Unless you want to impress your wife for 2025 and upgrade the fixture, you can replace.
You are using an out of date browser. It may not display this or other websites correctly.
You should upgrade or use an alternative browser.
You should upgrade or use an alternative browser.
The DIY thread - DIYourself
- Thread starter Red Mosquito
- Start date
qclabrat
Well-Known Member
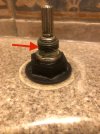
Who's the maker?All the ones I see online look to come off with a regular socket wrench. On this one it looks like I’d need a cone wrench to remove it. The threads for the trim piece is wider than the nut below. Does that seem right?
No clue. If it's marked anywhere it is well hidden. It's in a vanity so it's hard to see anything underneath. Too lazy to remove everything just to find out there is no marking that I'm missing.Who's the maker?
I'm wondering if this threaded part unscrews. Everything is so corroded nothing moves easily. Took an hour of soaking just to get the cover to unscrew.
No clue. If it's marked anywhere it is well hidden. It's in a vanity so it's hard to see anything underneath. Too lazy to remove everything just to find out there is no marking that I'm missing.
I'm wondering if this threaded part unscrews. Everything is so corroded nothing moves easily. Took an hour of soaking just to get the cover to unscrew.
View attachment 252884
the cone wrench thing is probably correct.
below the arrow, that section unscrews from the base below.
Get out the blaster!
Or just order new - nice holiday present for ya!
Is the ID on the handle?
Take that cartridge to home Depot and use their ID kit.
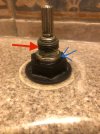
I'm going to guess it separates at the blue arrow, and that an adjustable can be used on the base below the counter to hold it
Of course I left all the cone wrenches for Chris since all my bikes have sealed bearings.the cone wrench thing is probably correct.
below the arrow, that section unscrews from the base below.
Get out the blaster!
Or just order new - nice holiday present for ya!
Is the ID on the handle?
Take that cartridge to home Depot and use their ID kit.
I'm going to guess it separates at the blue arrow, and that an adjustable can be used on the base below the counter to hold it
View attachment 252891
Of course I left all the cone wrenches for Chris since all my bikes have sealed bearings.
what about that skateboard? 😀
FastFreddy
Well-Known Member
Kinda looks like this Sigma faucet cartridge https://sigmafaucetparts.com/collections/volume-control-cartridges
The adapter threads for the escutcheon/trim next to the red arrow in Patrick's post should just unscrew and then you can use a regular wrench to remove the cartridge

The adapter threads for the escutcheon/trim next to the red arrow in Patrick's post should just unscrew and then you can use a regular wrench to remove the cartridge

ekuhn
Well-Known Member
Yes, it shgould separate at the blue line by turning the hex just above it.the cone wrench thing is probably correct.
below the arrow, that section unscrews from the base below.
Get out the blaster!
Or just order new - nice holiday present for ya!
Is the ID on the handle?
Take that cartridge to home Depot and use their ID kit.
I'm going to guess it separates at the blue arrow, and that an adjustable can be used on the base below the counter to hold it
View attachment 252891
That's what I figured. Just need to get the corroded piece above it off or find a cone wrench that fits.Yes, it shgould separate at the blue line by turning the hex just above it.
That's what I figured. Just need to get the corroded piece above it off or find a cone wrench that fits.
that corroded piece is connected - similar to the nut holding it to the counter. use a rifle file to clean it up, and get your cone on!!!!
iman29
Well-Known Member
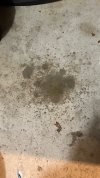
Went to the garage last night to prep the bike to rode today and found this leak coming from the upstairs bathroom. F**k there goes my ride plans. Took a quick look and it’s clearly the wax ring probably failed and I noticed one of the bolts was missing a nut to hold the toilet down.
Did my Zwift ride this morning since I knew this was gonna take at least 2-3 trips to the store because it’s plumbing.
Middle son was out already so he brought me a new wax ring kit so that saved me one trip.
Got the toilet drained and removed pretty easily. Cleaned up the flange and some “build up” on the drain opening with 2 pairs of gloves and Plastic bags. Installed the new wax ring and got it all reconnected. Turned the water on and no leaks. Flushed the toilet 5-6 times and……..leaking still into the garage. f**k.
Then I thought about it and decided the flange was maybe too low even tho the previous time I installed this toilet back in 2019 ( see my DIY bathroom remodel blog) it never leaked since then with a regular wax ring. Back to HD and got this flange extender thing which has an enclosed wax ring and a rubber helper gasket.
The good thing with this one is you can take it on and off without ruining it. Took a few tries to find the right combo but finally got it seated and reconnected everything. Must have flushed it 15 times before I finally put all my tools away and then noticed the water supply line was leaking. Went around the corner to Tractor supply instead of 20 minutes to HD and they literally had one toilet water line left. All hooked up and now leak free 🤞🏻
Totally elapsed time probably 3.5 hours. Stupid plumbing.
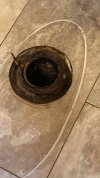
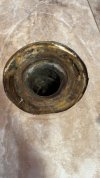
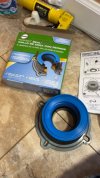
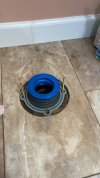


Zaskar
Well-Known Member
Thanks! I thought there was someone out there.
Red Mosquito
Formerly RLB the Scrapple Boy
Probably the only thing I dislike about the Bosch dishwasher is the fine screen on the drain, it’s a real PITA to clean. To be fair this does not seem to be unique to Bosch, but the KitchenAid we briefly had before this one did not have the fine screen which was a bonus in my book.
No before pics cause it’s gross, but if your dishwasher has one of these screens you probably have seen it before.
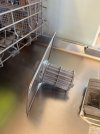
No before pics cause it’s gross, but if your dishwasher has one of these screens you probably have seen it before.

iman29
Well-Known Member
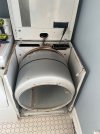
Did the same last year and could not believe Home Depot had the part.Replaced the belt on my 20-year-old dryer for $14 in about a half hour. Texted this picture to my buddy and he sent me a receipt for $425 to have his replaced about a year ago.
Also collected about $5 in change so…Winning!
View attachment 254714
And my dryer is coming up on 29 years old!
Can someone recommend a few bath and kitchen showrooms? Planning some renovations and the options on RT 22 are kinda sparse.
If you want to spend some coin, Zook Kitchens - I think he is in Readington on Pleasant Run Rd.
Has a showroom in his barn - and you can come see my kitchen.
He still pulls out a ruler and draws his drawers. 😀
He will supply whatever skilled labor you need, or work with you.


