The DIY thread - DIYourself

actually, we are going with a clawfoot tub so no tiled walls

How can I find the old floor tiles currently in my bathroom? It's probably like 8 yrs old. I really like them but I doubt I can find them again. I have one extra unused one. The only thing I remember it saying on the bottom is Made in Ecuador. Otherwise, I might lay some chic hardwood just under the tub and make it really stand out.

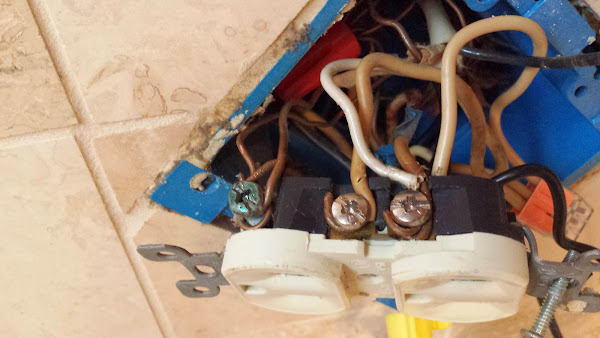
that peeling blue paint looks like one of my rooms. A little lead won't hurt.

check out some of the ceramics that look like wood (don't look at home depot, go to a tile store)...wouldn't use real wood. Don't let the price of these things knock you over, as the amount you need is small.
 
Lead is supposed to add some good flavor.

I'm just going to add the 1/4 and call it a day. My boxes are all adjustable, so I only need to jamb out 2 doors. I'll post my regrets on Sunday.
 
ImageUploadedByTapatalk1393963681.596127.jpg

Tile on display at Somerville lumber
 
Last edited:
I have all my drywall up and at least 1 coat on each seam, most have 2 at this point. Its going well so far but inside corners are giving me more trouble than I expected. I'm doing 1 side at at time like you're supposed to, but I keep destroying the inside corner when I smooth out the mud. Not sure what I'm doing wrong, maybe just ham handing it?

Couldn't avoid the butt, have one on the other wall too. We'll see how hard it is to actually get them to look good!


Also replaced the kitchen outlets with GFCIs. 1st was easy, but the second was a mess

20140316_144404.jpg


Yes, there were 4 hots and 4 neutrals jammed into a single outlet. Plus the garbage disposal rigged in there. When I first opened it up there was bare hot and neutral exposed from the back of wire nuts. I used the push-ins to clean it up and pigtail to the outlet, then I put the disposal and sink lighting on the load side of the GFCI. I should probably replace the box w/ one that has a hidden third gang.
 
All those Wires would be neater if you buy the nicer outlet that has the sandwich plate you put the wires in straight, 2 on each would fit nicely. One on each side of each screw. It's an option
 
Should have told the ass that wired it in 1988 :rolleyes:

I know what you mean, though that still seems to be pushing it. I didnt take a pic of the new outlet but there's only 4 wires + ground on it.
 
Yikes - that is an electric nightmare, and probably a code no-no. maybe tie all the hots and neutrals together (u know what i mean) and come up to the receptacle with pig tails. This would allow all the wired bundled to be tucked to the back.

yes - bigger box would help - maybe even deeper. can you slave the GFI, so only one is necessary?

also - it looks like some of the neutrals are already tied together at that quick-splice - might be able to eliminate one??

get a ground wire nut (green with a hole in the end) ties them together and leaves a pigtail for the receptacle. will save space over that giant red one.

looks like 14 & 12 gauge wiring mixed in there.

good to see you are addressing it.

don't worry about the opposite side of the inside corners on the first pass - doesn't matter if they get marked - angled knives make it easier.
 
Last edited:
It's always good to leave the box the same size and just stick it the back with a pigtail
 
Yikes - that is an electric nightmare, and probably a code no-no. maybe tie all the hots and neutrals together (u know what i mean) and come up to the receptacle with pig tails. This would allow all the wired bundled to be tucked to the back.

yes - bigger box would help - maybe even deeper. can you slave the GFI, so only one is necessary?

also - it looks like some of the neutrals are already tied together at that quick-splice - might be able to eliminate one??

get a ground wire nut (green with a hole in the end) ties them together and leaves a pigtail for the receptacle. will save space over that giant red one.

looks like 14 & 12 gauge wiring mixed in there.

good to see you are addressing it.

don't worry about the opposite side of the inside corners on the first pass - doesn't matter if they get marked - angled knives make it easier.

I did the pigtail thing, still messy in there though. Not sure what the limit is on number of connections in a box this size. The neutrals tied together was the beginning of my cleanup work.

Can't slave the GFIs because they're on different circuits :rolleyes: The 14ga is going up to the light above the sink. I don't think (I hope...) nothing else is tied off of it!

As for the drywall corners, I'm talking about my finish coat. I bedded the tape w/ a corner blade, that all workred out fine. When I smooth out my finish coat I keep digging in to the "apex" (for lack of better term) of the corner, not sure how I'm going to clean that up w/o sanding the crap out of it?
 
As for the drywall corners, I'm talking about my finish coat. I bedded the tape w/ a corner blade, that all workred out fine. When I smooth out my finish coat I keep digging in to the "apex" (for lack of better term) of the corner, not sure how I'm going to clean that up w/o sanding the crap out of it?

I wound up having to sand the crap out of it :) I was surprised at how hard it was to get smooth, so I'd be interested in suggestions as well.

On another topic...does anyone have a good reference book for landscaping with a focus on drainage? I have several different areas that need addressing in my yard and I'm looking for possible approaches. I came across this, but it's $30 for a used paperback:

http://www.amazon.com/Homeowners-Guide-Drainage-Control-Retaining/dp/0830631534/ref=sr_1_1?ie=UTF8&qid=1395081878&sr=8-1&keywords=drainage
 
here is an interesting problem - this is a ceiling corner, left side is the outside wall. the interior wall is not correctly integrated, same on the other side of the bathroom. The joist has lifted because there are two butted together. this caused some strange sheetrock problem in the old bath, now i know why.

2014-03-17%2017.17.32-s.jpg


going to have to put in some lumber behind it, then pull the joist down.
 
Do deck stair stringers need footings, or can they sit on pavers. The rise will only be 24" so only two steps plus the deck. I'm planning on one 3' wide staircase on one side and another 15' wide staircase that will take up most of the side of the deck facing the yard with a paver walkway leading out. I'm going to call the town but wanted some info before I do.
 
Do deck stair stringers need footings, or can they sit on pavers. The rise will only be 24" so only two steps plus the deck. I'm planning on one 3' wide staircase on one side and another 15' wide staircase that will take up most of the side of the deck facing the yard with a paver walkway leading out. I'm going to call the town but wanted some info before I do.

No footings needed.

Did my wide ones with 8x8s stacked/pinned with rebar - passed inspection no problem.
 
Since the joist ended over the wall, there was not enough meat to use a hurricane tie. The board was not installed correctly, and was left floating when it was nailed to the studs above - cut all the nails back 5' or so, clamped the joist back into place, put in nails and screws, and boards to hold it "down and out" - a shim closes the last 1/8th

Also tied the corner together with some screws so it doesn't crack.

2014-03-17%2017.17.32-s.jpg
2014-03-19%2015.20.22-s.jpg
 
Last edited:
Nice! Hopefully the funky sheetrock problems are solved.

I've spent the past few evenings spackling (corner hell...) Finally got my last coat down on everything (minus 1 outside corner I have) and started sanding. And sanding. The tapers and butts aren't bad at all, but I definitely goofed the corners so that's where my sanding is. Hope to be priming by late Saturday...
 
Finally !@#$%^& done with spackling. First coat of primer is on, giving it a few hours to dry before I sand it. Gotta wait to prime again because 1 gallon wasn't enough for 2 coats, of course :rolleyes:


20140323_144847.jpg
 
New bathroom subfloor installed. The green is structural warmboard. It is clad with aluminum, and channeled for radiant floor pex. The wooden floor is where the shower is going - it is slightly lower, so the sill isn't so high.

2014-03-27%2016.40.21-s.jpg
 
I assume you screw/adhesive warm board down to the sub floor. How does flooring go on top? I assume tile only, but do you have to pour concrete over it then tile or can you screw a double layer of wonder board over top (avoiding lines) and tile to that? Also, can that stuff go under a tub so the tub is warm?
 
Back
Top Bottom