


You are using an out of date browser. It may not display this or other websites correctly.
You should upgrade or use an alternative browser.
You should upgrade or use an alternative browser.
Fixing pianos, bikes, and myself **New, now with accordions and concertinas!**
- Thread starter Karate Monkey
- Start date
Karate Monkey
Well-Known Member
When you're using a chisel to gently pry/plane off [inconsistently] thin veneer, first stop: sharpening town. I saved y'all the pain of 4 different "progress shots" through stropping. I need a new set of chisels--none of these are "square" with the tang, and I actually have the funds to buy a decent set (but not the consistent use for them).

I was treated to some good news, though: the veneer was press-on, so I don't need to worry about anything other than removing tape residue later, when I go to install the new veneer with hide glue (because I'm a masochist, and I don't use it enough to justify using it for 1 random joint). In some of the close ups, you can see the fuzzy remains of the tape on the frames.

While peeling off the veneer, I felt a 'thunk' on the chisel...a 'thunk' I am all too familiar with. It must have been Friday at the concertina factory, because there was a random brad banged through the frame, hidden under the veneer. No, it wasn't holding anything on...

I re-stropped the chisel (which thankfully didn't chip the edge), and finished removing all the veneer from the frames. After re-gluing the broken joints later, I'll scrape the outsides to prep for the new veneer. I am somewhat miffed that the outer layer of the ply is up/down, not left-right, so scraping is gonna be a pain in the behind. There was a blob of glue that was holding the sounding board to the other frame, and I had originally decided to cut the large mass off with a modelling saw, but this proved fruitless, as it was too brittle to get started. I scraped it down with the edge of a chisel point blade, then shaved the remnants off the frame by the same.


I used a diamond rotary scribe to remove the rounded-over point of the brad, then a center punch to start it out of the hole. I finally extracted the brad with a pair of flush-cutters, rocked over a hex key as a fulcrum, so I didn't damage the wood around it. When I get to gluing everything else, I'll likely use a shaved toothpick to fill the hole.


I took the time to scrape the exposed sides of the frames, to get rid of person oils/dirt (left done, right pending). I will be making several other small changes to the instrument physically during rebuilding--so, more of a "restomod" than straight conservation--so I plan to fill the broken/chipped edges here or there, and apply veneer to the top edge, too...even though the instrument didn't originally have it there. I think it will wind up looking nicer, longer.

Much of this work would fall in the real world to simply building a new case for the instrument, but I find these parts of repairs quite satisfying when they are done. Some other poor instrument will come along later, and I'll try my hand at building an entirely new case for it.
I was treated to some good news, though: the veneer was press-on, so I don't need to worry about anything other than removing tape residue later, when I go to install the new veneer with hide glue (because I'm a masochist, and I don't use it enough to justify using it for 1 random joint). In some of the close ups, you can see the fuzzy remains of the tape on the frames.
While peeling off the veneer, I felt a 'thunk' on the chisel...a 'thunk' I am all too familiar with. It must have been Friday at the concertina factory, because there was a random brad banged through the frame, hidden under the veneer. No, it wasn't holding anything on...
I re-stropped the chisel (which thankfully didn't chip the edge), and finished removing all the veneer from the frames. After re-gluing the broken joints later, I'll scrape the outsides to prep for the new veneer. I am somewhat miffed that the outer layer of the ply is up/down, not left-right, so scraping is gonna be a pain in the behind. There was a blob of glue that was holding the sounding board to the other frame, and I had originally decided to cut the large mass off with a modelling saw, but this proved fruitless, as it was too brittle to get started. I scraped it down with the edge of a chisel point blade, then shaved the remnants off the frame by the same.
I used a diamond rotary scribe to remove the rounded-over point of the brad, then a center punch to start it out of the hole. I finally extracted the brad with a pair of flush-cutters, rocked over a hex key as a fulcrum, so I didn't damage the wood around it. When I get to gluing everything else, I'll likely use a shaved toothpick to fill the hole.
I took the time to scrape the exposed sides of the frames, to get rid of person oils/dirt (left done, right pending). I will be making several other small changes to the instrument physically during rebuilding--so, more of a "restomod" than straight conservation--so I plan to fill the broken/chipped edges here or there, and apply veneer to the top edge, too...even though the instrument didn't originally have it there. I think it will wind up looking nicer, longer.
Much of this work would fall in the real world to simply building a new case for the instrument, but I find these parts of repairs quite satisfying when they are done. Some other poor instrument will come along later, and I'll try my hand at building an entirely new case for it.
johnbryanpeters
Well-Known Member
A concertina?When you're using a chisel to gently pry/plane off [inconsistently] thin veneer, first stop: sharpening town. I saved y'all the pain of 4 different "progress shots" through stropping. I need a new set of chisels--none of these are "square" with the tang, and I actually have the funds to buy a decent set (but not the consistent use for them).
I was treated to some good news, though: the veneer was press-on, so I don't need to worry about anything other than removing tape residue later, when I go to install the new veneer with hide glue (because I'm a masochist, and I don't use it enough to justify using it for 1 random joint). In some of the close ups, you can see the fuzzy remains of the tape on the frames.
While peeling off the veneer, I felt a 'thunk' on the chisel...a 'thunk' I am all too familiar with. It must have been Friday at the concertina factory, because there was a random brad banged through the frame, hidden under the veneer. No, it wasn't holding anything on...
I re-stropped the chisel (which thankfully didn't chip the edge), and finished removing all the veneer from the frames. After re-gluing the broken joints later, I'll scrape the outsides to prep for the new veneer. I am somewhat miffed that the outer layer of the ply is up/down, not left-right, so scraping is gonna be a pain in the behind. There was a blob of glue that was holding the sounding board to the other frame, and I had originally decided to cut the large mass off with a modelling saw, but this proved fruitless, as it was too brittle to get started. I scraped it down with the edge of a chisel point blade, then shaved the remnants off the frame by the same.
I used a diamond rotary scribe to remove the rounded-over point of the brad, then a center punch to start it out of the hole. I finally extracted the brad with a pair of flush-cutters, rocked over a hex key as a fulcrum, so I didn't damage the wood around it. When I get to gluing everything else, I'll likely use a shaved toothpick to fill the hole.
I took the time to scrape the exposed sides of the frames, to get rid of person oils/dirt (left done, right pending). I will be making several other small changes to the instrument physically during rebuilding--so, more of a "restomod" than straight conservation--so I plan to fill the broken/chipped edges here or there, and apply veneer to the top edge, too...even though the instrument didn't originally have it there. I think it will wind up looking nicer, longer.
Much of this work would fall in the real world to simply building a new case for the instrument, but I find these parts of repairs quite satisfying when they are done. Some other poor instrument will come along later, and I'll try my hand at building an entirely new case for it.
Karate Monkey
Well-Known Member
A concertina?
It is the instrument that would eventually become the modern Accordion. They are (the English ones, a different pattern of instrument, though externally similar) sometimes known as a "squeezebox".

(By Peter Trimming - Flickr: Dipper No.188, CC BY 2.0, https://commons.wikimedia.org/w/index.php?curid=30629593)
They have a novel way of doubling the number of notes available, with most of the keys playing a different tone whether you push/pull the instrument (the common chromatic harmonica works the same way).
Karate Monkey
Well-Known Member
NBD, just sitting on the floor of the garage lighting stuff on fire

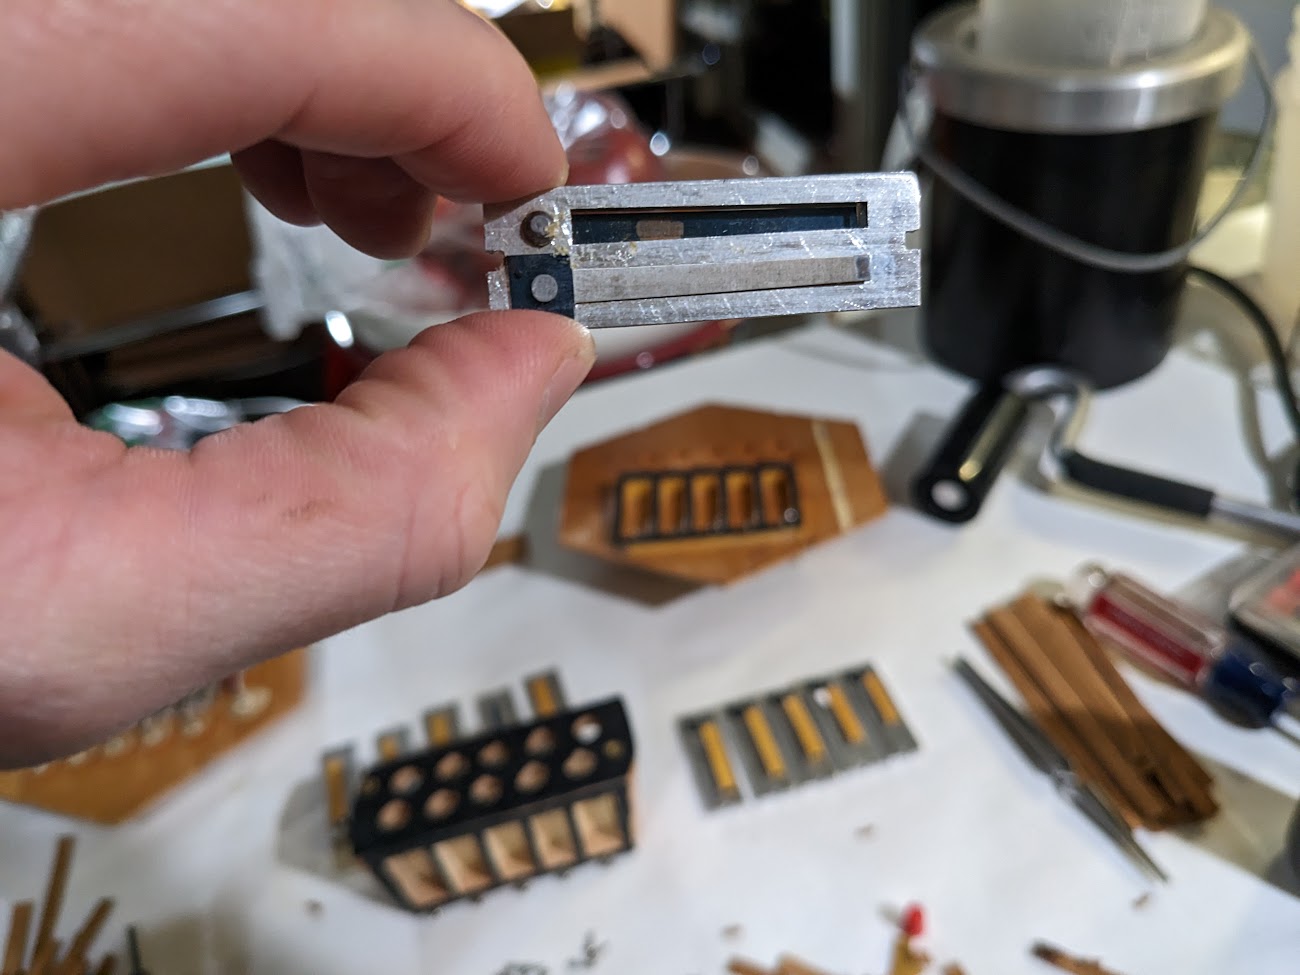
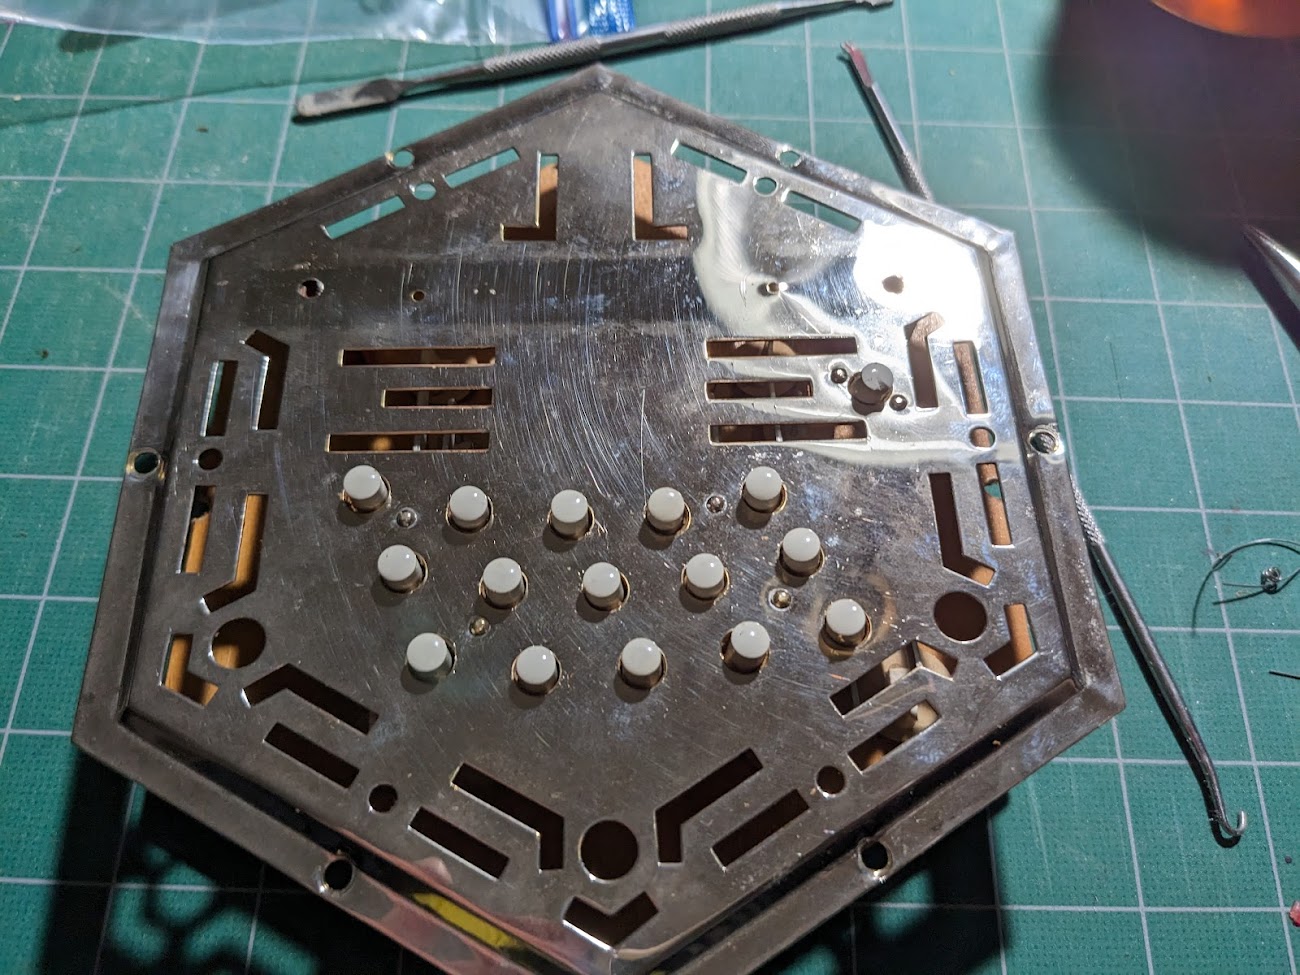
I'm making a new (thicker) batch of burnt shellac for re-gluing leathers in the concertina, which are attached to an aluminum [brass or steel on really old ones] plate on the other side of the reed. Hide glue obviously won't work on metal, and I'm using the traditional techniques that would be used to repair instruments...because if you're going to do it, do it right, right?

One of the bass note reed pans. You can see that instead of traditional wax sealing, there is a thin layer of suede glued on the part. It's definitely more 'leaky' than waxed parts, but it definitely more durable for swinging humidity. I'd have to look into the history of the company, but part of me really wants to believe that Stagi made instruments in a place not-too-far from the sea, and was doing it for the durability factor, instead of the cheap factor.

Sizing the leathers. I used the tiny screwdriver that I was using to remove the screws on the reed pans to divot the strip where it needed to be cut, then used a[n apparently discontinued pair of Fiskars] scissors that had pseudo-serrations on the lower blade to snip the strip to length. The serrations were nice, since they kept the leather from squirting out of the scissors when chopping it, which was a real time saver vs. a utility knife/the cutter I was using.
Some of the reeds had some hidden corrosion on the obverse sides (which I could hear as a discordant tone when I gave the instrument a quick play). I scraped the loose stuff off using a tiny screwdriver, then used a cut-off q-tip to rub some polishing paste on the spot to get rid of the rust. A quick clean up with the other end of the bud removed the remaining paste. The reeds won't be perfect in tone after having rust, but there will be a significant improvement.

Around half-way through the bass side of the instrument, I shaped up with my glue application; the leathers facing out really had no stringent requirements, but the ones facing into the pan had to clear the sides, which meant they needed to be butted right up to the reed next to them...and any large glue beads would creep to the reed, messing up the sound/causing buzzing sounds. The little 'U' shape helped to get the glue where it needed to be, with minimal squeeze out.

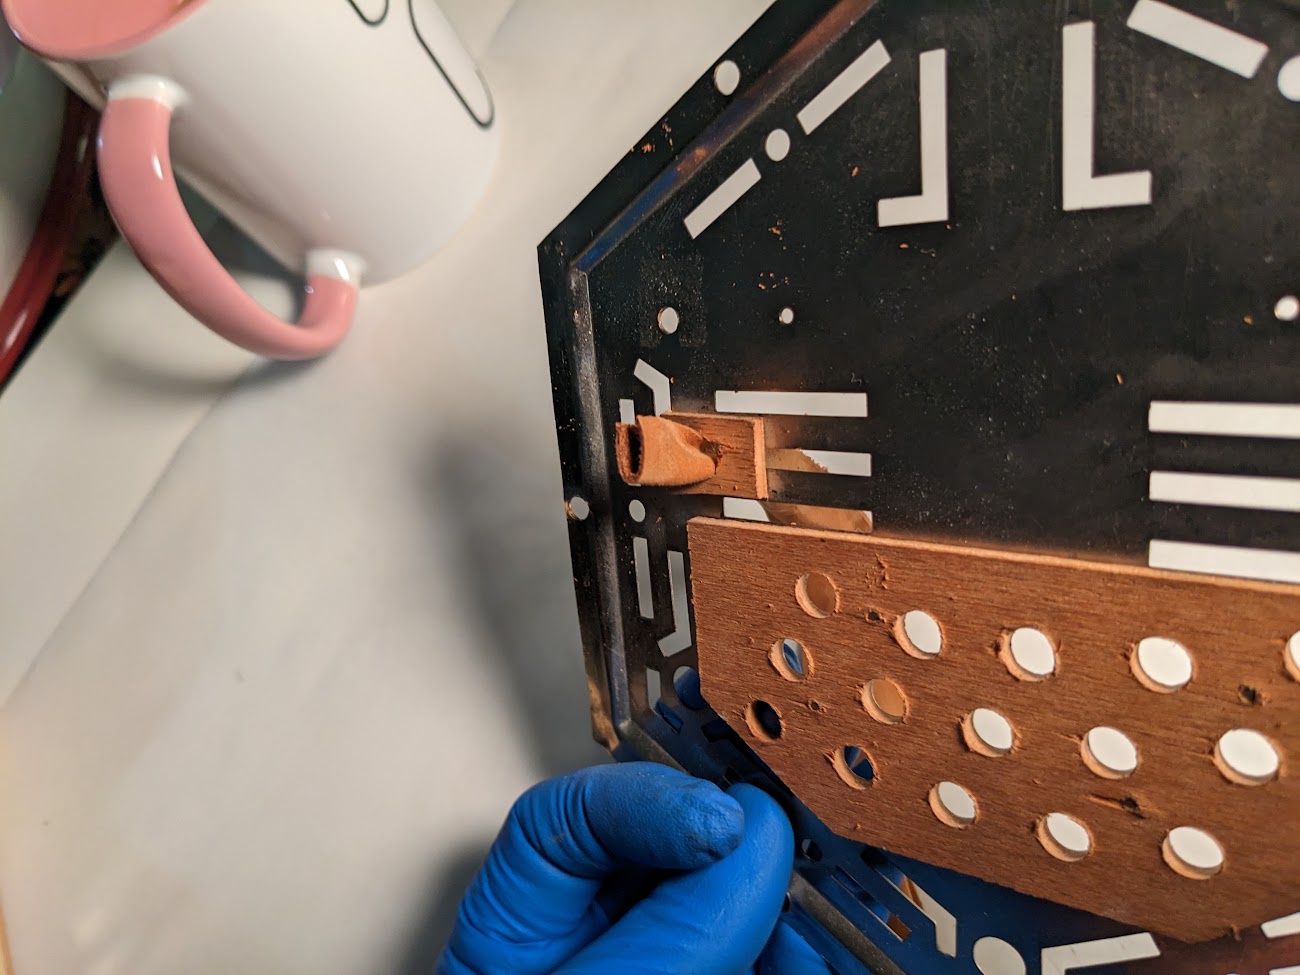
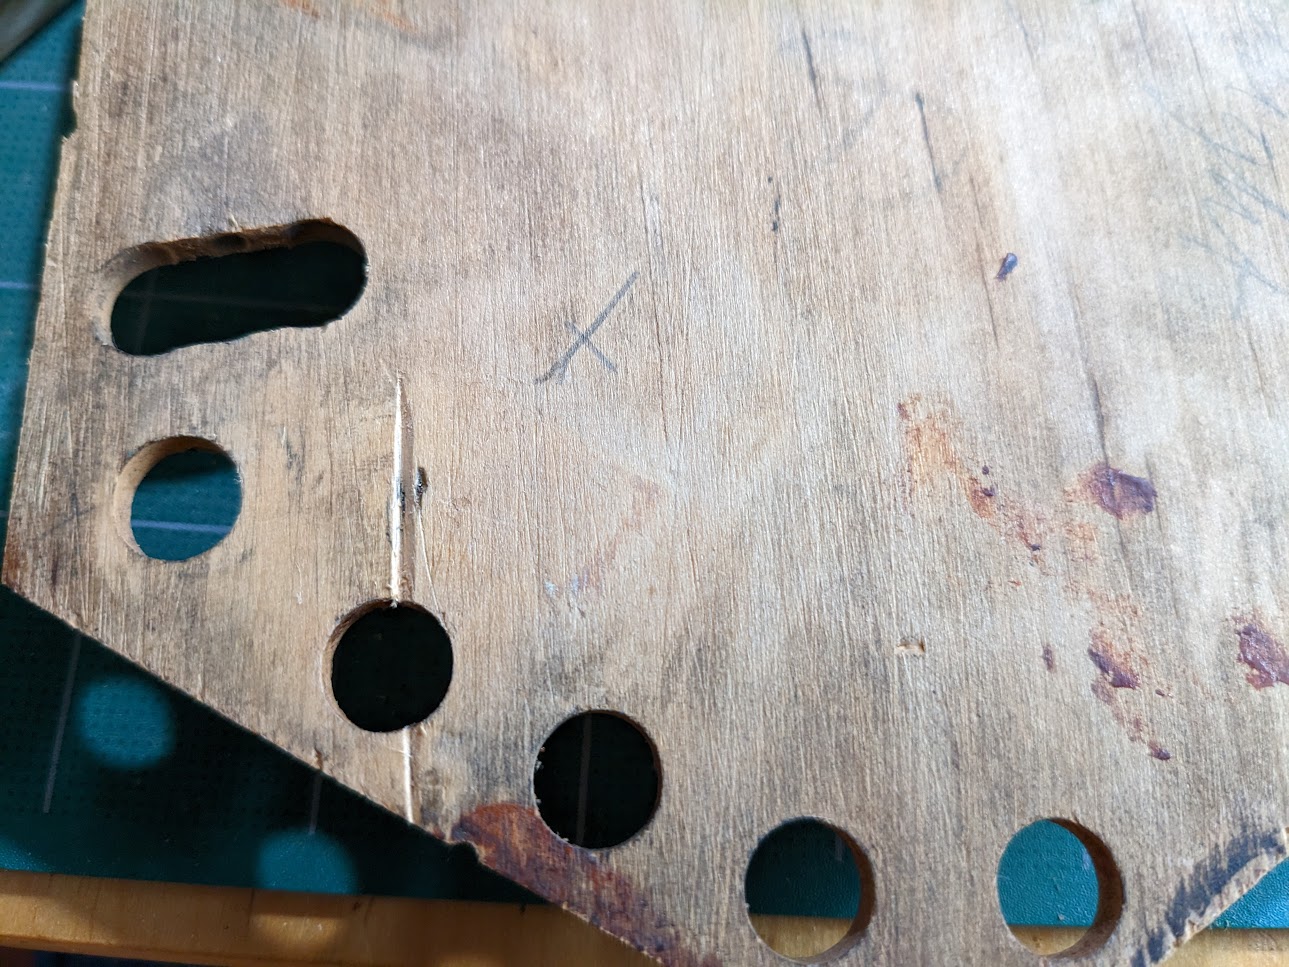
See that off-white strip? My Spidey sense was tingling the second I saw it, and while I was waiting for the leathers to dry after gluing, I took the opportunity to chip it off--it wasn't hard--and see what was going on under there. Apparently, whoever was working on this piece, tore off a layer of the ply, and "replaced" it with a splurt of glue. I used a piece of tissue paper to trace out the shape of the missing sliver, and grabbed a piece of my veneer, which was the right thickness for the missing bit. Taped up to the veneer, I used a utility nice to cut out the "pattern" I made, and brought it over. Using an x-acto knife, I made the minor adjustments here/there, until the sliver could be pressed in with minor pressure. I hit the hide glue into the valley with another q-tip, placed the piece in/pressed it down, then put a piece of waxed paper over top, and clamped over the length with a parallel clamp.
I took the time to also glue up the broken frame, but with the use of hide glue, I didn't mess with taking pictures. It's still kinda cool in the house, and hide glue sets FAST when it's not warm.
I'm making a new (thicker) batch of burnt shellac for re-gluing leathers in the concertina, which are attached to an aluminum [brass or steel on really old ones] plate on the other side of the reed. Hide glue obviously won't work on metal, and I'm using the traditional techniques that would be used to repair instruments...because if you're going to do it, do it right, right?
One of the bass note reed pans. You can see that instead of traditional wax sealing, there is a thin layer of suede glued on the part. It's definitely more 'leaky' than waxed parts, but it definitely more durable for swinging humidity. I'd have to look into the history of the company, but part of me really wants to believe that Stagi made instruments in a place not-too-far from the sea, and was doing it for the durability factor, instead of the cheap factor.
Sizing the leathers. I used the tiny screwdriver that I was using to remove the screws on the reed pans to divot the strip where it needed to be cut, then used a[n apparently discontinued pair of Fiskars] scissors that had pseudo-serrations on the lower blade to snip the strip to length. The serrations were nice, since they kept the leather from squirting out of the scissors when chopping it, which was a real time saver vs. a utility knife/the cutter I was using.
Some of the reeds had some hidden corrosion on the obverse sides (which I could hear as a discordant tone when I gave the instrument a quick play). I scraped the loose stuff off using a tiny screwdriver, then used a cut-off q-tip to rub some polishing paste on the spot to get rid of the rust. A quick clean up with the other end of the bud removed the remaining paste. The reeds won't be perfect in tone after having rust, but there will be a significant improvement.
Around half-way through the bass side of the instrument, I shaped up with my glue application; the leathers facing out really had no stringent requirements, but the ones facing into the pan had to clear the sides, which meant they needed to be butted right up to the reed next to them...and any large glue beads would creep to the reed, messing up the sound/causing buzzing sounds. The little 'U' shape helped to get the glue where it needed to be, with minimal squeeze out.
See that off-white strip? My Spidey sense was tingling the second I saw it, and while I was waiting for the leathers to dry after gluing, I took the opportunity to chip it off--it wasn't hard--and see what was going on under there. Apparently, whoever was working on this piece, tore off a layer of the ply, and "replaced" it with a splurt of glue. I used a piece of tissue paper to trace out the shape of the missing sliver, and grabbed a piece of my veneer, which was the right thickness for the missing bit. Taped up to the veneer, I used a utility nice to cut out the "pattern" I made, and brought it over. Using an x-acto knife, I made the minor adjustments here/there, until the sliver could be pressed in with minor pressure. I hit the hide glue into the valley with another q-tip, placed the piece in/pressed it down, then put a piece of waxed paper over top, and clamped over the length with a parallel clamp.
I took the time to also glue up the broken frame, but with the use of hide glue, I didn't mess with taking pictures. It's still kinda cool in the house, and hide glue sets FAST when it's not warm.
Karate Monkey
Well-Known Member
I flew too close to the sun today.
I got cocky about the temperature of the house/my skills with hide glue, and got halfway through veneering one frame before I gave up. The veneer was so dry [good!] that when I painted hide glue on it, it immediately curled up. The room was so middling-ly cold (68 degrees) that if I painted the frame, and stuck the veneer on that, it was practically set before the veneer was in place.
I salvaged the three pieces by waving it over the stove and furiously rolling the veneer into place, before giving up on the roller altogether and just rolling my thumbs along it. I'm 75/25 on the veneer being "acceptable" by the time I go back to it.
The hide glue (day 2ish) was also getting a bit gloppy despite the tight fitting lid, which didn't help.
Strike three was the veneer saw. Every article I've read, and everyone says, "veneer saws are so much better than knives, [blah blah blah]". After the third super careful cross-cut breaking the grain, I ditched it for the old standby razor knife. A perfect cut every time, and I could even bevel the edges to better meet up for the final hexagonal shape.
I will reset, after I find my old-school work lamp, and an old-school floodlight for it. Keeping the frame/veneer warm while working should take care of the super-fast set problem. The light and heat won't hurt me, either.
Karate Monkey
Well-Known Member
Several days of progress:
First was the finished veneer. Even with switching a heatlamp bulb into the drop light, conditions were still a bit off with the veneer. I took to swiping the side of the veneer not getting glue with a cloth dipped in warm water/wringed out. No further issues--just a time consuming cut-test fit-cut-test fit-cut-test fit process, since the frame wasn't a "perfect" hexagon. So much for duplication. I eventually resorted to cutting all my pieces slightly long, and trimming them down from there.

(Side shot, showing trimmed top piece)

(Glued up, rough trim)

(Scraped/relieved)
After finishing the veneering, of the pieces, I fixed the missing ply from the soundboard:

(You'll see in a minute)
I traced the "missing" area on the soundboard using a piece of tissue paper, then duplicated it roughly on a piece of veneer. It's never perfect, so after a few trial and error fits, I scraped it down to see where it was messed up. A combination of using 1) a narrow strip of veneer brought to a point, glued in with hide glue, then pared down to the surface, and 2) the sanded dust from a small piece of veneer, mixed with enough shallac to make a paste (mine was too watery, que será, será), then applied with a card to push it into the deep spots, then sanded down flush--yielded an acceptable repair.

(It'll look even better inside the instrument where you can't see it)

(Coat one of [final tally] fifteen)
I moved on to the end plates, at this point. I new I wanted to bush the key holes...but I didn't want to modify the instrument permanently...which meant that even the thinnest available bushing cloth would be too thick to fit with the existing buttons. I gave it about 5 seconds of thought, and realized that English pianos used leather bushings in some places, so I figured: why not? I skived a piece of leather down to size, trimmed it to width, and pointed it.

(Pull the strip through up to the end, slap on some glue, and stick in a caul)

Long story short...I messed up my math, and the bushings were so thick I couldn't fit the keys in. The glue joint was also too small to ream more than a little of the size...so I threw up my hands, and yanked the bushings out. Oh well...
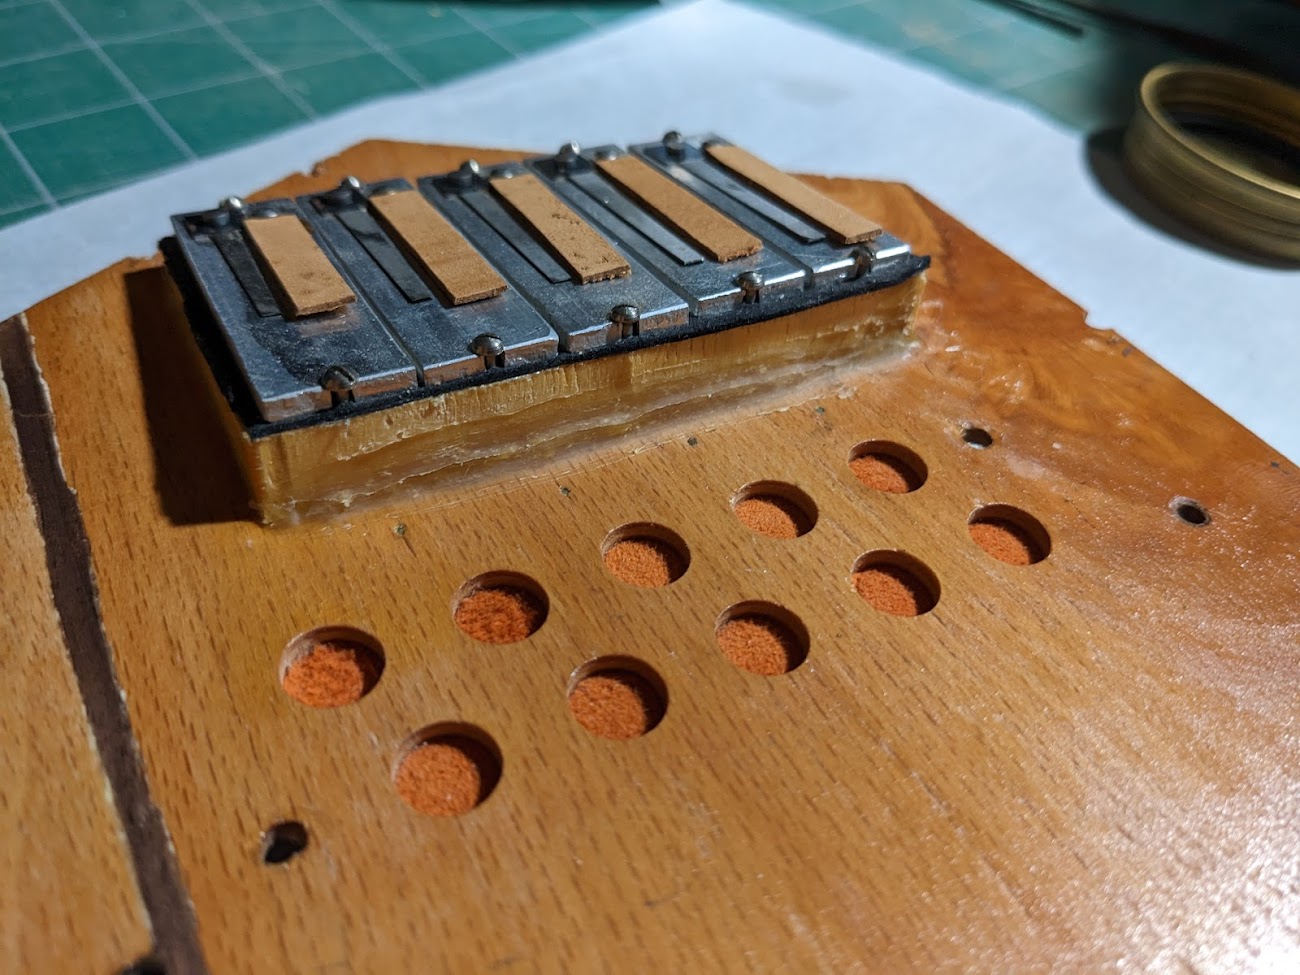
I moved on to fixing the potential 'leaky' spots on the reed pans using traditional methods: wax. When I had opened up the accordion that I was given, I noted that beeswax had definitely had something added to it, and the color/smell was unmistakable: pine tar. I had already made beeswax/pine tar/turpentine blocks for my waxed canvas stuff, so all I really needed to do was hack a piece off and dilute it with more beeswax. 20 minutes later after baby-sitting the double boiler, I poured it out into the mold, and left it to harden.

(see lower right corner for "missing" glue bead)
(Fixed the other side, too)
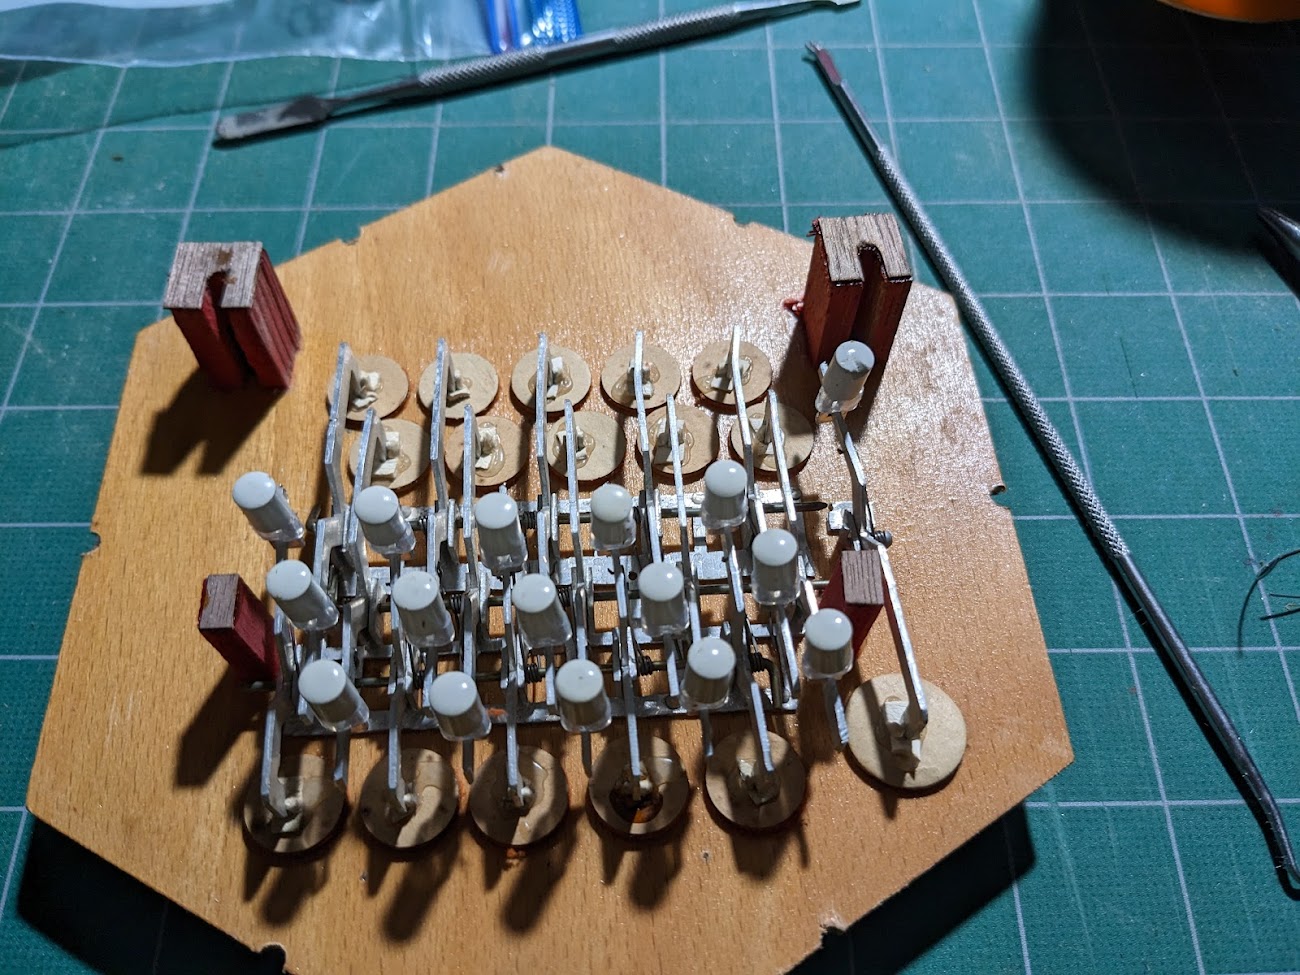
You can see the suede of the dampers peeking through the holes above. I wanted to take the time to make sure it was all good (and it was, other than some minor compaction), so I took the action apart.

I used a spring hook tool (indispensable for musical instruments, and oddly enough, mechanical slot machine repair...) to unhook each spring from the lever, before sliding out the pivot rail.
A couple of careful wiggles/tugs later, and I had the levers free.

(Before)

(After carding)
Last stop (today) was cleaning the keys themselves, and replacing all the rubber bands (it's really fuel line hose, shh) with new pieces, and checking their fit on the action.

After I regulate the other side of the action, I'll be putting it together for a test "firing" to see what needs further attention. I already know that the bellows need a bit of work, but I won't be able to address that until I can actually see/hear where they're leaking...so, soon.
In a few more days, the frames will be ready to rub down with pumice/rotten stone, finishing out the second largest part of the repair.
First was the finished veneer. Even with switching a heatlamp bulb into the drop light, conditions were still a bit off with the veneer. I took to swiping the side of the veneer not getting glue with a cloth dipped in warm water/wringed out. No further issues--just a time consuming cut-test fit-cut-test fit-cut-test fit process, since the frame wasn't a "perfect" hexagon. So much for duplication. I eventually resorted to cutting all my pieces slightly long, and trimming them down from there.
(Side shot, showing trimmed top piece)
(Glued up, rough trim)
(Scraped/relieved)
(You'll see in a minute)
(It'll look even better inside the instrument where you can't see it)
(Coat one of [final tally] fifteen)
(Pull the strip through up to the end, slap on some glue, and stick in a caul)
I moved on to fixing the potential 'leaky' spots on the reed pans using traditional methods: wax. When I had opened up the accordion that I was given, I noted that beeswax had definitely had something added to it, and the color/smell was unmistakable: pine tar. I had already made beeswax/pine tar/turpentine blocks for my waxed canvas stuff, so all I really needed to do was hack a piece off and dilute it with more beeswax. 20 minutes later after baby-sitting the double boiler, I poured it out into the mold, and left it to harden.
(see lower right corner for "missing" glue bead)
(Fixed the other side, too)
A couple of careful wiggles/tugs later, and I had the levers free.
(Before)
(After carding)
In a few more days, the frames will be ready to rub down with pumice/rotten stone, finishing out the second largest part of the repair.
Karate Monkey
Well-Known Member
One side regulated (all the keys are the same height, nothing hits anything else before the full travel of the key, and dampers are covering the holes evenly), and keys spaced. Back hurts too much to do the other side today. I don't know what happened to the one key with a chunk taken out of it, but I filed it down with a riffler, and polished the top. I flipped it around so it doesn't wind up being in a spot that will bother the fingertips.
Fixing one small part of the action that wasn't moving freely, I had to remove a row of springs. Somehow(?) the spring on the end of the row slipped off the lever, and flew off the bent pin. It thwacked into the wall, and after 5 minutes, I realized there was no way in hell I was going to find it. Being .020 wire, I also didn't have any from the piano...so I raided my busted autoharp, and unwound one of the middle strings. I think the wire was actually .019, since even with an extra turn in the torsion section, it still wasn't 100% the same as the other springs (which also appeared to be phosphor bronze, instead of steel, but who's keeping track, am I right?). Fun fact: if you need to make a spring, music wire is already hardened/tempered, so there you go.
Fixing one small part of the action that wasn't moving freely, I had to remove a row of springs. Somehow(?) the spring on the end of the row slipped off the lever, and flew off the bent pin. It thwacked into the wall, and after 5 minutes, I realized there was no way in hell I was going to find it. Being .020 wire, I also didn't have any from the piano...so I raided my busted autoharp, and unwound one of the middle strings. I think the wire was actually .019, since even with an extra turn in the torsion section, it still wasn't 100% the same as the other springs (which also appeared to be phosphor bronze, instead of steel, but who's keeping track, am I right?). Fun fact: if you need to make a spring, music wire is already hardened/tempered, so there you go.
The minute you put that thing all back together, you will step on that lost spring.One side regulated (all the keys are the same height, nothing hits anything else before the full travel of the key, and dampers are covering the holes evenly), and keys spaced. Back hurts too much to do the other side today. I don't know what happened to the one key with a chunk taken out of it, but I filed it down with a riffler, and polished the top. I flipped it around so it doesn't wind up being in a spot that will bother the fingertips.
Fixing one small part of the action that wasn't moving freely, I had to remove a row of springs. Somehow(?) the spring on the end of the row slipped off the lever, and flew off the bent pin. It thwacked into the wall, and after 5 minutes, I realized there was no way in hell I was going to find it. Being .020 wire, I also didn't have any from the piano...so I raided my busted autoharp, and unwound one of the middle strings. I think the wire was actually .019, since even with an extra turn in the torsion section, it still wasn't 100% the same as the other springs (which also appeared to be phosphor bronze, instead of steel, but who's keeping track, am I right?). Fun fact: if you need to make a spring, music wire is already hardened/tempered, so there you go.
Karate Monkey
Well-Known Member
The minute you put that thing all back together, you will step on that lost spring.
I'm waiting to step on it when I decide to go barefoot. They seem to have "cut" the ends by heating/pulling.
Karate Monkey
Well-Known Member
The instrument played surprisingly well considering the seat-of-the-pants repairs to the reeds. After a few goes taking it apart/futzing with setting the reed action, I realized that several of the leathers needed some reinforcement on the bass side of the instrument--there was thunk-ing on some notes when playing, where the leather sealed "all of a sudden" when playing a note, and on others, the leather was too long/floppy (even after stiffening it before embarking on replacing them) to seal properly, so a couple of notes would wheeze before the leather settled into place. The original bellows, though difficult to expand, are actually airtight! I am pleasantly surprised that given how well-regulated the reeds are, the smaller, difficult-to-expand bellows are not as large of a downside as it could be.

(Just sitting at the table, rubbing it out)
Reinforcement consists of a thin strip of stainless shim trimmed into a "spring", then fastened to the leather. I used a shellac stick to melt a blob on top of the spring, then held it down while it set.
 (Yes, a "bunsen burner". Alcohol lamps are used extensively in instrument repair)

The springs will undoubtedly need to be trimmed to get the right action when playing, but that will have to wait until...

I install the new handrests/hardware. Without access to my bandsaw, 99% of the finer work had to be done using a coping saw/chisel. I was able to use a low-angle plane to do the tops, though. Thinning the thumb rests from the original (which were twice the height, to make way for the wood screws attaching them through the back of the sound board) meant that I needed to install threaded inserts. With experience installing such, I knew it would be prudent to test it on scrap first. 1) the EZlok stuff that I had access to was absurdly large for a 4-40--the pilot was 1/4", and the nominal size with the external threads was ~0.365"...and 2) my stock was only 0.5" actual wide. Needless to say, even with thinning down the wildly large threads, and over-sizing the hole, the stock would immediately split on install. I ordered a bag of heat-sets, and I'm going to epoxy them in. Once the inserts are in place, I'll finish cutting/drilling the necessary holes, then shellac them to match the original white oak rests.
I finished up the day by waxing the frames that had sat for 24 hours after the last rubbing. After they cure, I'll evaluate what they look like, and likely follow up with hard-paste wax.
(Just sitting at the table, rubbing it out)
Reinforcement consists of a thin strip of stainless shim trimmed into a "spring", then fastened to the leather. I used a shellac stick to melt a blob on top of the spring, then held it down while it set.
The springs will undoubtedly need to be trimmed to get the right action when playing, but that will have to wait until...
I finished up the day by waxing the frames that had sat for 24 hours after the last rubbing. After they cure, I'll evaluate what they look like, and likely follow up with hard-paste wax.
Karate Monkey
Well-Known Member
My derpy attempt to put new screen on the inside of the left end plate:

And my less stupid approach:

Cutting one piece turned out to be less trouble than 3 pieces, not having to worry about lining stuff up/runs/etc. All fastened with burnt shellac, which flattened out when fully cured. The netting was nylon, so I just used a poker to burn out the screw holes.

(Polishing the buckle hardware, as well as the heads of the little screws that will get re-used)

(Inserts inserted with 30 minute epoxy, no splitting)
I eventually came to the conclusion that my helper springs were causing some weird harmonics when playing, so I tore them all out (benefit of shellac sticks, thankfully--just chip it off). I was going to start scratching at a reed that was particularly out of tune to try to bring it back into tune with the rest of the instrument, but I read something that indicated that even if there isn't corrosion present, reeds often go out of tune due to stuff built up on them; I wound up scrubbing down the rest of the ones I didn't clean before with a few cut down/shaped q-tips, and put it back together...and the instrument was (mostly) in tune. I'll still wind up having to work over the reeds, but I'm in a better place to do that, now.
I'm continuing to futz with the voicing of the reeds, which is limited somewhat by the poor grind on some of the bass reeds--rather than clamping a weight on the end, three of the six really long ones have sizeable unground sections, which significantly impacts the flexibility, and therefor, playing action. Weights are generally avoided--if possible--with reeds, but I think this is the greater of two evils, personally. Two of the notes have bad honks when the air speed gets slower. Nothing to be done, unfortunately, other than replacing them. Reeds are apparently kind of hard to come by, so I'll have to wait for a donor instrument to come along. I also need to build a "tuning bellows" so I don't need to remove, scrape/file, replace, test, remove, etc. every time I futz with the reeds. I guess I'll be building those bellows sooner than I thought (at least I can use the originals for tuning!).
Hopefully will record a video of it in action, soon, my poor playing skills aside!
And my less stupid approach:
(Polishing the buckle hardware, as well as the heads of the little screws that will get re-used)
(Inserts inserted with 30 minute epoxy, no splitting)
I'm continuing to futz with the voicing of the reeds, which is limited somewhat by the poor grind on some of the bass reeds--rather than clamping a weight on the end, three of the six really long ones have sizeable unground sections, which significantly impacts the flexibility, and therefor, playing action. Weights are generally avoided--if possible--with reeds, but I think this is the greater of two evils, personally. Two of the notes have bad honks when the air speed gets slower. Nothing to be done, unfortunately, other than replacing them. Reeds are apparently kind of hard to come by, so I'll have to wait for a donor instrument to come along. I also need to build a "tuning bellows" so I don't need to remove, scrape/file, replace, test, remove, etc. every time I futz with the reeds. I guess I'll be building those bellows sooner than I thought (at least I can use the originals for tuning!).
Hopefully will record a video of it in action, soon, my poor playing skills aside!
Karate Monkey
Well-Known Member
Felt some disconcerting creaks while playing along, and realized that the straps were not long for this world. I had already cut new hand straps, but I intended to save them, so I quick cut up a piece of belt blank.


Looks much less finished than I'd like, but it's really more about not exploding, at this point.
Looks much less finished than I'd like, but it's really more about not exploding, at this point.
Karate Monkey
Well-Known Member
I called the surgeon's office the other day, because I was not nearly as convinced as the PT that nothing was wrong, when after every session of increasing exercise load, I wound up having to back off for a week. Extra insulting, since I only GET 30 PT sessions covered, and that used 18 of them. Not ready to burn bridges yet, but it's definitely tickling the back of my brain.
Surgeon was willing to write the first time off as "too much", now he's ordering an[other] MRI to make sure there's nothing going on. I'm crossing every ****ing finger I have, because I've been doing nothing strenuous for 2 months, other than going to PT 3 times a week. I fail to see how I could have done anything other than something relating to physical therapy.
Progress shot of the french polishing:

I decided to do the frames, too, since they were going to have to wait for the work I'm doing at the moment. I stripped off the wax, and got to work...and I'm honestly glad for it. They look much better, with a deep lustre. I'm still going to rub out the finish with a little rottenstone, though.
I started work on the bellows/bellows frames. I taped together my matboard using cambric (bookbinder's) tape; it was frustrating, to say the least. The bellows for the instrument are so shallow--to clear the reed pan on the left side--that I had to use narrow strips of mat, and commensurately narrow strips of tape. It was fussy, and sometimes wouldn't land where it needed to, and wouldn't adhere fully to the edges of the board. I did "pairs" to begin with, and then started building out from the pairs...but in trying to get a decent bond and leaving it to cure a bit, the board got wiggly. So goes water-based adhesives.

Skivved leather glued into the valleys

It sits overnight in a 'mold', then gets clamped...as soon as I make sure it's free.
Surgeon was willing to write the first time off as "too much", now he's ordering an[other] MRI to make sure there's nothing going on. I'm crossing every ****ing finger I have, because I've been doing nothing strenuous for 2 months, other than going to PT 3 times a week. I fail to see how I could have done anything other than something relating to physical therapy.
Progress shot of the french polishing:
I decided to do the frames, too, since they were going to have to wait for the work I'm doing at the moment. I stripped off the wax, and got to work...and I'm honestly glad for it. They look much better, with a deep lustre. I'm still going to rub out the finish with a little rottenstone, though.
I started work on the bellows/bellows frames. I taped together my matboard using cambric (bookbinder's) tape; it was frustrating, to say the least. The bellows for the instrument are so shallow--to clear the reed pan on the left side--that I had to use narrow strips of mat, and commensurately narrow strips of tape. It was fussy, and sometimes wouldn't land where it needed to, and wouldn't adhere fully to the edges of the board. I did "pairs" to begin with, and then started building out from the pairs...but in trying to get a decent bond and leaving it to cure a bit, the board got wiggly. So goes water-based adhesives.
Skivved leather glued into the valleys
It sits overnight in a 'mold', then gets clamped...as soon as I make sure it's free.
Karate Monkey
Well-Known Member
Attempt #1 at bellows manufacture (Bookbinding? Bellows-binding?) was an abject failure. Some of the skiver sat nicely, some didn't...and some of the spots didn't get enough glue, so whole sections pulled up. My cambric tape job was also sloppy. Take two saw wider strips of cambric, pretty much touching when glued up all the way. If the bellows on the instrument were deeper, I don't think it would've been a "problem" in the first place, but these are pretty shallow due to the bass reed pan protruding into the bellows.
Take two:

I ordered actual skiver for this one. Trying to make my own from buckskin scraps was...irritating bordering on a waste of time. With a cranked/power-fed skiver, it might be possible, but I'm not dropping several hundred dollars on a tool for this just yet.
After futzing with what felt like several hundred [nb: only 30ish) cuts with a radial arm saw instead of a miter saw, I wound up with 12 identical pieces to build a new bellows frame, but my heart sunk when I actually lined up the glued frames with the ends of the instrument: too small. I cut down the rest of my 6 linear feet remaining, and touched up the pieces on the belt sander to perfect the angles, and success!
It may surprise you to know that instruments, being handmade, are rarely perfectly spaced. After puzzling how to make sure the screws wound up in the right spots, I hit [pun intended] on the obvious solution: use the screws. I placed the ends over the new frames, and used a tack hammer to whack an imprint in the frames.

You can see the remnants of (unsatisfactory) pencil marks on the bottom frame from my first attempt. Observing another instrument that I have, there are pencil markings all over the inside of the instrument to guide it back together in the proper orientation, and I took inspiration from that, here...literally marking the left/ride sides of the instrument, with their correct orientation when everything gets put together. I'll have to double check inserts (I need 6-40, grumble) for possible fits on there, but I suspect that I'll have to surface mount a small plate, and tap it, due to not enough material.
Take two:
(Crisp peaks)

(Crisp valleys--obverse side)
(Crisp valleys--obverse side)
I ordered actual skiver for this one. Trying to make my own from buckskin scraps was...irritating bordering on a waste of time. With a cranked/power-fed skiver, it might be possible, but I'm not dropping several hundred dollars on a tool for this just yet.
After futzing with what felt like several hundred [nb: only 30ish) cuts with a radial arm saw instead of a miter saw, I wound up with 12 identical pieces to build a new bellows frame, but my heart sunk when I actually lined up the glued frames with the ends of the instrument: too small. I cut down the rest of my 6 linear feet remaining, and touched up the pieces on the belt sander to perfect the angles, and success!
It may surprise you to know that instruments, being handmade, are rarely perfectly spaced. After puzzling how to make sure the screws wound up in the right spots, I hit [pun intended] on the obvious solution: use the screws. I placed the ends over the new frames, and used a tack hammer to whack an imprint in the frames.
Karate Monkey
Well-Known Member
Final answer, with micrometer checking: it's a 5-40, so I'm definitely making threaded plates. I cut the bellows into "cards" today, and I don't trust this to sit out unmolested, so it'll have to get the threaded plates added after.

The last row has its cards shortened to center them in the rabbet I cut using the table saw when I ripped the stock down.


The linen strapping that connects it to the frames has been trimmed, and it awaits me building out a form to hold it open while I work on the next step.
The last row has its cards shortened to center them in the rabbet I cut using the table saw when I ripped the stock down.
The linen strapping that connects it to the frames has been trimmed, and it awaits me building out a form to hold it open while I work on the next step.
Karate Monkey
Well-Known Member
Been meaning to show this process, called "shimming"*
See the crack (dark line)? It's scraped out using a razor/special tool.

Knock down most of the material with a chisel, or plane if it fits.
Astute viewers will notice that this does not resemble the instrument I've been working on. This is correct.
*Called "shimming", because a long, thin shim (usually maple, but can be whatever wood you have) is glued in place with hide glue. These are specially made for piano rebuilders, but can be made from scraps (as I've done here). After planing down to the surface, it's scraped with a card. Pianos would then get a coat of lacquer, but the inside of instruments typically do not. Guitar/violin family instruments lack enough wood to shim cracks. Instead, they're repaired with nitrocellulose lacquer and "bowties". Particularly old violins can look like an ancient frog's behind on the inside, since bowties are usually used freely in old instruments.
See the crack (dark line)? It's scraped out using a razor/special tool.
Knock down most of the material with a chisel, or plane if it fits.
*Called "shimming", because a long, thin shim (usually maple, but can be whatever wood you have) is glued in place with hide glue. These are specially made for piano rebuilders, but can be made from scraps (as I've done here). After planing down to the surface, it's scraped with a card. Pianos would then get a coat of lacquer, but the inside of instruments typically do not. Guitar/violin family instruments lack enough wood to shim cracks. Instead, they're repaired with nitrocellulose lacquer and "bowties". Particularly old violins can look like an ancient frog's behind on the inside, since bowties are usually used freely in old instruments.
Karate Monkey
Well-Known Member
Starting the surface mounting plates.
And putting the art textbooks to work!