FattyStripper tubeless setup

viper8315

Active Member
Hello All,

As a new owner of a fatbike, I needed to convert to tubeless. I've read about a couple different methods, and I also asked Gary from Bike n Gear, and he suggested to go with the fattystrippers. Well, I must say, I think it is the lightest, most robust setup I've seen. The latex bands weigh almost nothing compared to several wraps of gorilla tape, and they won't absorb any sealant over time. I did a quick search on here, and didn't find any other posts in regards to this product, so I figured I'd share a positive initial response after converting my front tire last night. I only took a couple photos of the finished product because I was in a bit of a hurry last night to just get one tire done, but I'll post more pics during the conversion of the rear tire if anyone is interested. I'll also document any issues I see along the way.

For the record, I'm not affiliated with their website at all, and paid for the stuff out of my own pocket.

The website:
http://www.fattystripper.com/
http://fattystripper.com/install.html

Install notes for my setup
1. Did not use foam backer rods
2. Used the fattystripper valve stems which include spacers
3. Used 4 oz Orange seal Endurance
4. Didn't use any glue to hold the band
5. Just used water to lube the tire/band to seat the bead
6. EXTREMELY IMPORTANT, do not attempt to push the valve stem through the latex band and the rim at the same time. Lift the band up, insert the stem through the band, then insert the stem into the rim. The instructions actually say to do this, but I read them quick and learned the hard way.

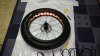
Initial pics are attached, I still have to trim off the excess, but it looks great!
 

Attachments

  • IMG_20161212_212349266.jpg
    IMG_20161212_212349266.jpg
    70.1 KB · Views: 675
  • IMG_20161212_212306769.jpg
    IMG_20161212_212306769.jpg
    74.6 KB · Views: 786
Gonna get these soon! Thanks for the tip on the valve stem/latex band... Gonna go with the orange seal endurance. That was the tipping point I couldn't get good reliable information on. Since I have 10+ patches on the front tube this year... I think this will be a better solution!!

Tom
 
Cool. I'm going to try the split tube on some rims I have, it that goes south I will try fatty stripper
 
you know, after reading the title quickly, i'm really disappointed in this thread. :D:D:D:D:D

---

ps - good info, and yeah, more pics
LOL, yea, after I hit post, I thought twice about my choice of topic. Well, at least it'll get some attention.

I'm using the stock tire/rim setup on my Fatboy (Stout XC 90 / Ground Control fat). As far as the tubeless supplies, 4 strips (glad I bought extras since I tore one, hence the note above), a set of valves, and the orange "bling" strips, and shipping came to $50.

I'll get some more pictures tonight when I convert the rear tire.
 
I remember reading a review somewhere and it was pointed out that FattyStripper was listed on the return shipping label, and the guys wife picked up the mail and had some very serious questions lol.
 
How sturdy are those "bling strips" and do they stop the strips from bulging out of the holes? Definitely interested in hearing more about these.
 
They are sturdy. Unless you're completely careless in the installation of them, I don't see a way for the latex bands to get past them. If you're talking about the bling strips themselves bulging out, they do slightly bulge out the holes once you air up the tire. I don't consider it excessive like some of the tape setups I've seen pictures of. I'll get some more detailed pics tonight.

Also, when you place your order, you supply your rim specs, and the bling strips are cut to match the width. I did not have to do any trimming of the bling strip for my install.
 
Ok so here are some more detailed pics of the conversion. First, a disclaimer, my intent is not to replace the directions provided by fattystripper. You should read their instructions at the link below, and watch their video to have a full understanding of the process.
http://fattystripper.com/install.html

Starting from a bare rim, try to align the bling strip so that its edge is hidden behind metal. Use a small piece of tape to temporary hold it in place (first pic). Also, you want to make sure your overlap is over the valve area, so do your best to try to center the overlap at the valve. You might want to do a couple test wraps just to make sure the strip is centered on the rim.

Put another larger piece of tape on the inside of the wheel to securely hold it place for the final wrap once you're happy with it's location (second pic).


tape1.jpg tape2.jpg
 
Wrap the bling strip around the rim and pull it fairly tight. Mark the bling strip where the overlap stops (first pic). Pull up the small piece of tape from the first step, and it should bring the CLEAR backing along with it. Cut the CLEAR backing at the mark you made. If you get any white material, you're trying to pull off too much. Wrap the strip around the rim pulling it tight, keeping it center, etc. Push it down over the exposed adhesive area. Carefully remove your other piece of tape holding the strip, and you're done with this stage (second pic).


mark_bling.jpg bling_done.jpg
 
Using a sharp object (I used a small drill bit), poke a starter hole for the valve stem. Make sure to properly support the bling strip as you push through (first pic). Using a larger sharp instrument (I used a larger drill bit and a reamer on my leatherman) enlarge the hole. Try to do it from the top, so excess material falls below and not into the area inside the tire. Enlarge the hole so that the valve stem goes through easily. The more time you spend here, the easier the next stage will be.

Edit: Blow/clean off any debris from making the hole.

Valve_hole1.jpg Valve_hole2.jpg Valve_hole3.jpg Valve_hole_done.jpg
 
Last edited:
hmmmm, judging from the pics it looks like my rim strips are much thinner and the gorilla tape is thicker/heavier than the fatty stripper. 6 of 1 , half dozen the other from what it looks like. This would be a great option for those with rims that do not convert tubeless easily. I have Mulefut rims and they have such a nice bead lock, that they go tubeless super easy. This might be an option for you @mike_243
 
Install the latex band onto the rim. Please refer to the instructions and video for proper technique. Take your time, don't rush it. From this point forward, DON'T SET THE RIM DOWN ON THE EDGES.

When you're happy with the band placement, install the valve stem completely. As I said in my first post, LIFT UP THE BAND AND PUSH THE VALVE THROUGH THE BAND FIRST. If you don't, the latex band will push into the hole and get jammed, then you'll tear the band pulling it back out. Yes, I learned this the hard way. Thankfully, I bought 2 spare bands on my original order.
 

Attachments

  • latex_band.jpg
    latex_band.jpg
    46.6 KB · Views: 512
  • latex_valve.jpg
    latex_valve.jpg
    52.2 KB · Views: 531
Optional step, use some soapy water, or just plain water to lubricate the latex band in the bead area. I just used a damp paper towel.

Get the tire back on the rim at this point. Do your best not to move the latex band around too much. Make any adjustments to the band so that it's centered again.

Seat the tire bead, put sealant in, then re-inflate to 15 PSI. Do the shake, shimmy, and rotate dance with the tire and then you're all set. The picture shows why I like to use the Orange Seal, the injector is a super easy way to get the sealant into the tire after seating the bead. I have a conceptual disagreement with opening a bead that was just seated in order to put sealant in, but whatever floats your boat.

Sealant.jpg
 
Oh, Frank, this last pic is for your benefit. It shows how much the bling strip bulges. It really doesn't at all. This pic was taken with 15 PSI in the tire which is way above where it will be actually used at.
bling_strip_inflate.jpg
 
hmmmm, judging from the pics it looks like my rim strips are much thinner and the gorilla tape is thicker/heavier than the fatty stripper. 6 of 1 , half dozen the other from what it looks like. This would be a great option for those with rims that do not convert tubeless easily. I have Mulefut rims and they have such a nice bead lock, that they go tubeless super easy. This might be an option for you @mike_243

Well, the thing that steered me away from using gorilla tape was that I read on two forums the tape tends to absorb sealant over time and get heavier and heavier. I have no personal experience with the tape, but I saw this setup when Gary mentioned it, and figured he would know what works the best. I would also think this method would save you time on the backend as well whenever you go to make a tire or tape change. Using all that gorilla tape will take a good amount of elbow grease to get off the rim so it's clean again. Whereas this setup will come off much easier since nothing is "stuck" to the rim.
 
Back
Top Bottom